Link Party Statistics

Link Party Statistics is a metric available to any link party and it gives you an idea of how far your link party has gone.

On the InLinkz dashboard, a small graph icon appears at the top left of each link party. Upon opening it up, you’ll be given some data about the link party.

Link party statistics

Statistics

Link party statistics

Impressions: this is a total count of all the times the Link Party loads. Ιn other words, this includes the times your link party has been shown up in your followers’ browsers.

Verified and Unverified Links: this tally shows how many of the submitted links have been verified or remain unverified, correspondingly.

Total Link Clicks: this rate indicates the clicks the submitted links received in total.

The ideal link party will have both a high impression number and a high total clicks rate. Having both means that your link party spread far and people find interesting the submitted links to engage with.

How many impressions have your link parties received?

How To Increase Your Blog’s Engagement

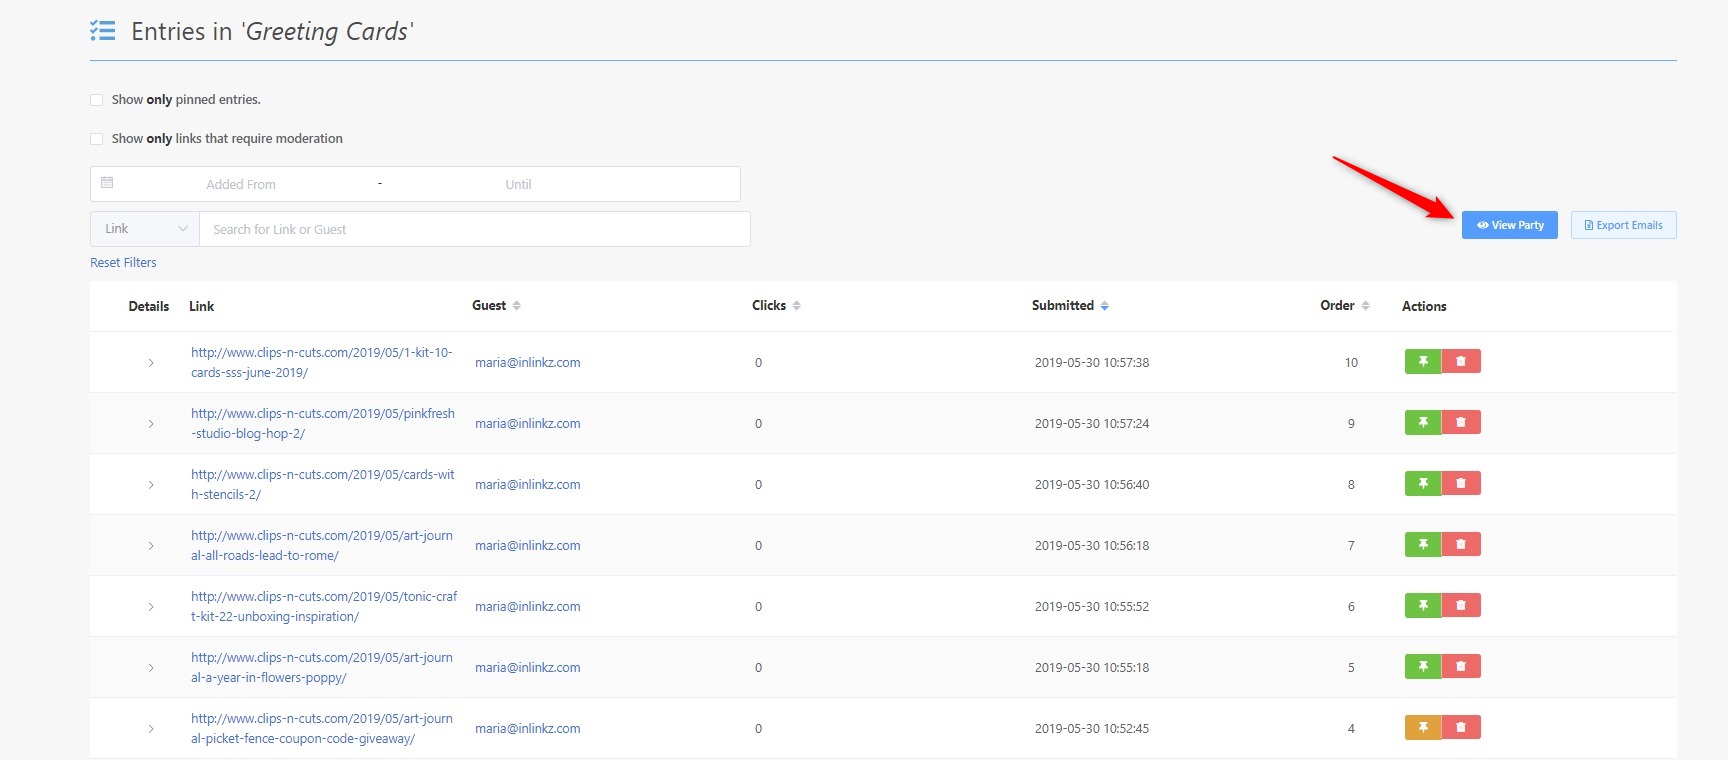
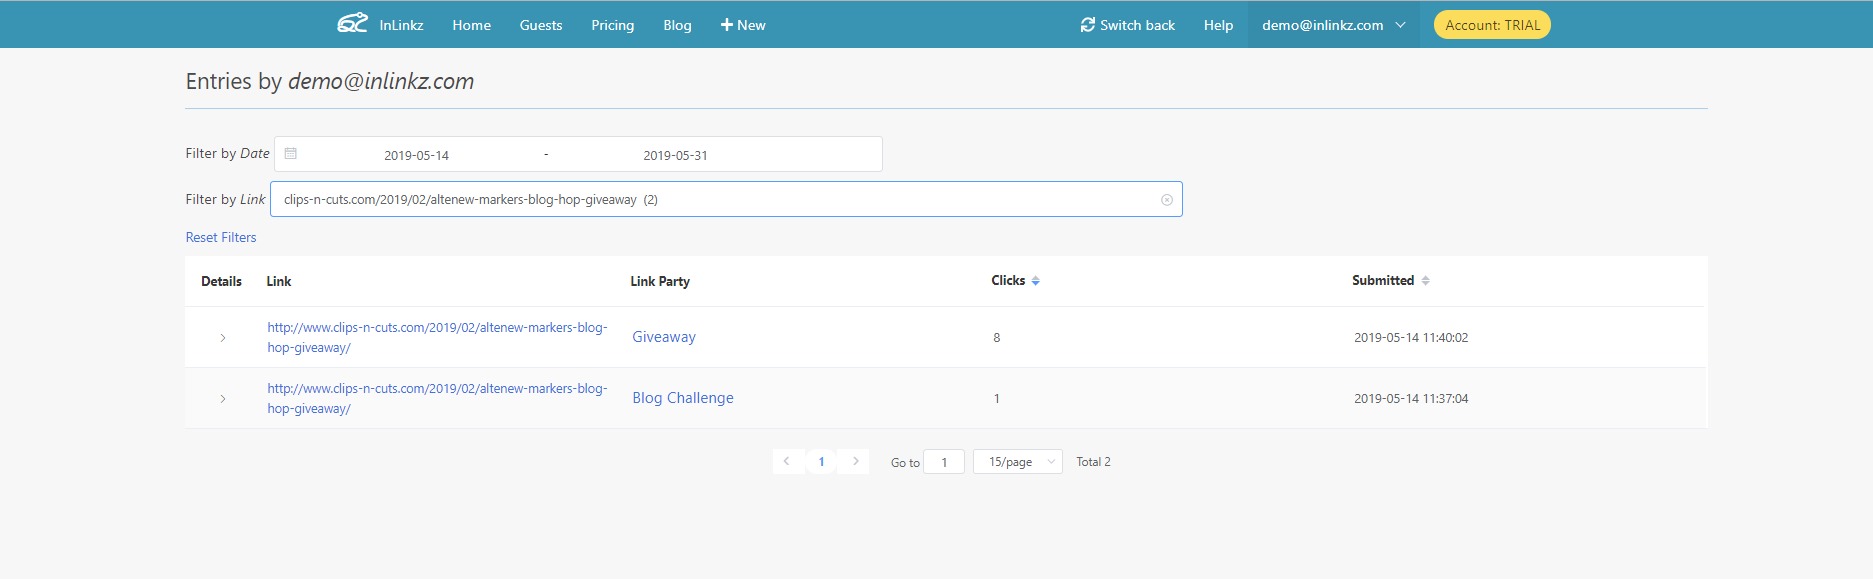
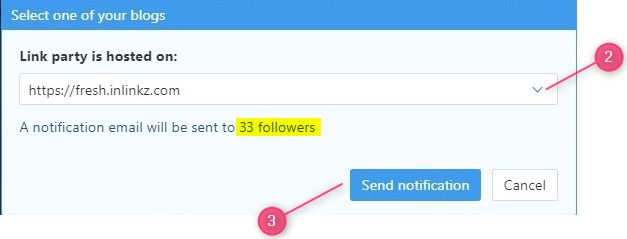
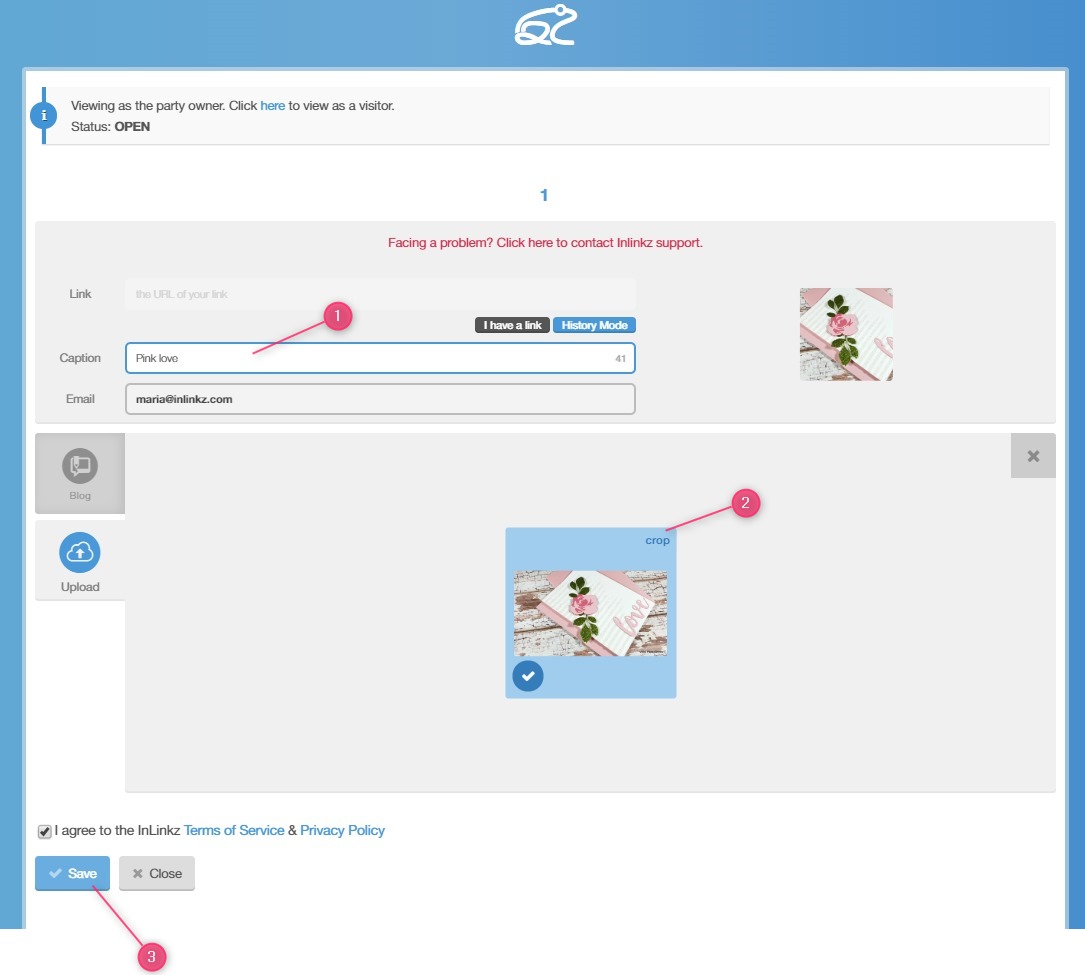
One of the reasons you are hosting or taking part in a link party is to get more clicks on your images (aka your posts) and increase readers’ engagement on your blog.

A good way to manage this is either advising your readers to submit good photography links, if you are the host of the blog party or submitting good photography links to the link party you are invited if you are the guest.

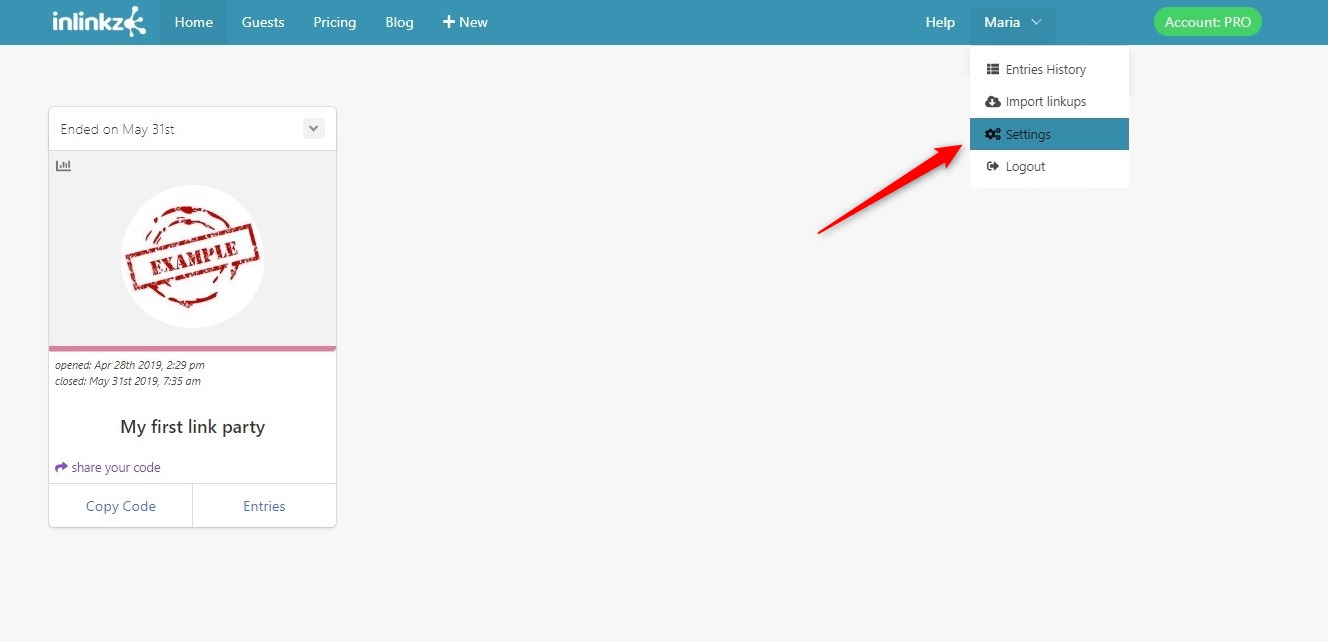
Reading the following post will shed more light on the above statement and help you raise your blog’s prestige!

Let’s see what a good image link can do!

Support your point

A nice, beautiful and interesting image can attract your readers’ attention and urge them to share it in social networks. It can also add real value and insight into your blog-link. Getting your readers to stop and think is something every blogger hopes to do.

Let’s see an example:

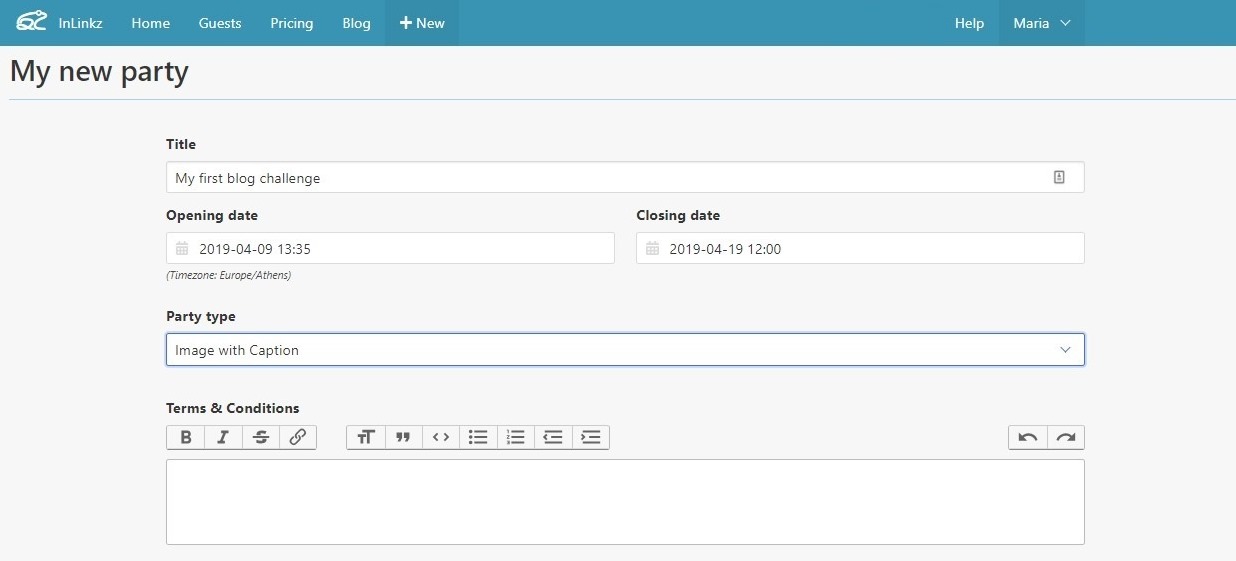
Suppose that your link party theme is “October colors”.

From the two following images, which one would you choose?

Attract your readers' attention

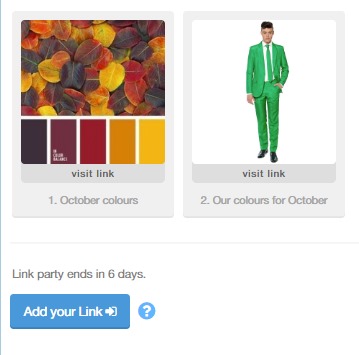
Well, I bet you know the answer…that’s exactly my point!

Present your message

Another perspective of images is that they can make an introduction to your topic. Readers usually notice images first and as this photo is going to be used as a thumbnail on your blog and social media may have a huge impact on your traffic. Is it compelling enough to motivate the readers to find out more? Does it tell them what your blog is about?

Let’s say that your blog is about “Recipes“. And the theme of the link party is “Recipes” also. Which of the following images do you believe would give the reader a clear view of what your blog is about?

Present your message

The first one.” You will point out correctly.

Make your blog more memorable

If you get a fantastic picture, an image that’s both cool and interesting your readers and followers will love it and want to share it with their friends. Thus you will gain more traffic to your blog.

Notice the two following images. They have the same theme. “Desert”. However, the camel figures in the second one, make it stand out.

Make your blog more memorable

Achieve an emotional connection

As it is said, an image is worth 1000 words. A single image can bring on deep emotions and meanings to another person. If the theme of the link party allows it, you should pick an image that will touch your readers on an emotional level. The readers may have different emotional reactions. They could be happy, excited, etc. Since the photo can cause various reactions, the audience will react positively to it.

Now your link party theme is “Summer“. How can you support it better?

Achieve an emotional connection

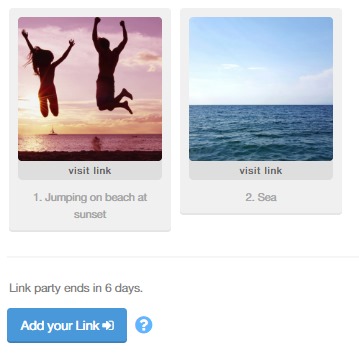
You will point out, that both of these photos are beautiful. True. But only the first one brings joyful and carefree emotions to the readers.

Show professionalism

This way, you infuse trust with your readers.

Our theme is “Fashion” and we have the two following images:

Show professionalism

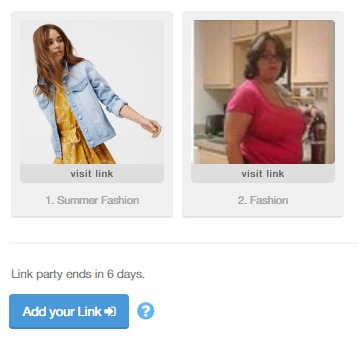
Which one do you believe seems more professional? That’s right, the first one!

Hold the attention longer

Since your image is beautiful, your audience will enjoy looking at it. Because of that, they will click on it and visit your blog. It can even increase the chances that your reader will check on other contents of your blog especially if it is full of beautiful and interesting images.

Another link party theme is “Garden”.

Look at the two following images:

Hold the attention longer

Which one is more beautiful and holds the attention longer? Yes… the second one!

Your blog link looks outstanding

The right image will individualize your blog and help you convert a lot of readers. This way it will stand out from millions of others.

Let’s say that our theme is “Nail polishing“. Which of the following two do you believe stands out from the other?

Your blog link looks outstanding

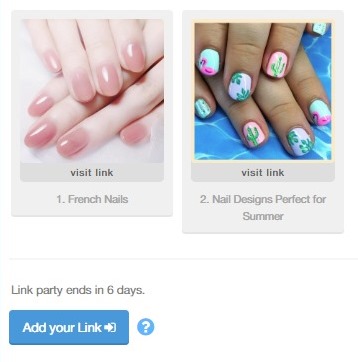
Apparently the second one again.

It gives a personal touch, YOUR personal touch.

A valuable photograph portrays the true nature of you and your blog. Customize the design, size, and quality of your photos and promote the personality of your blog. When people visit your blog, they want to know the people they will be interacting with.

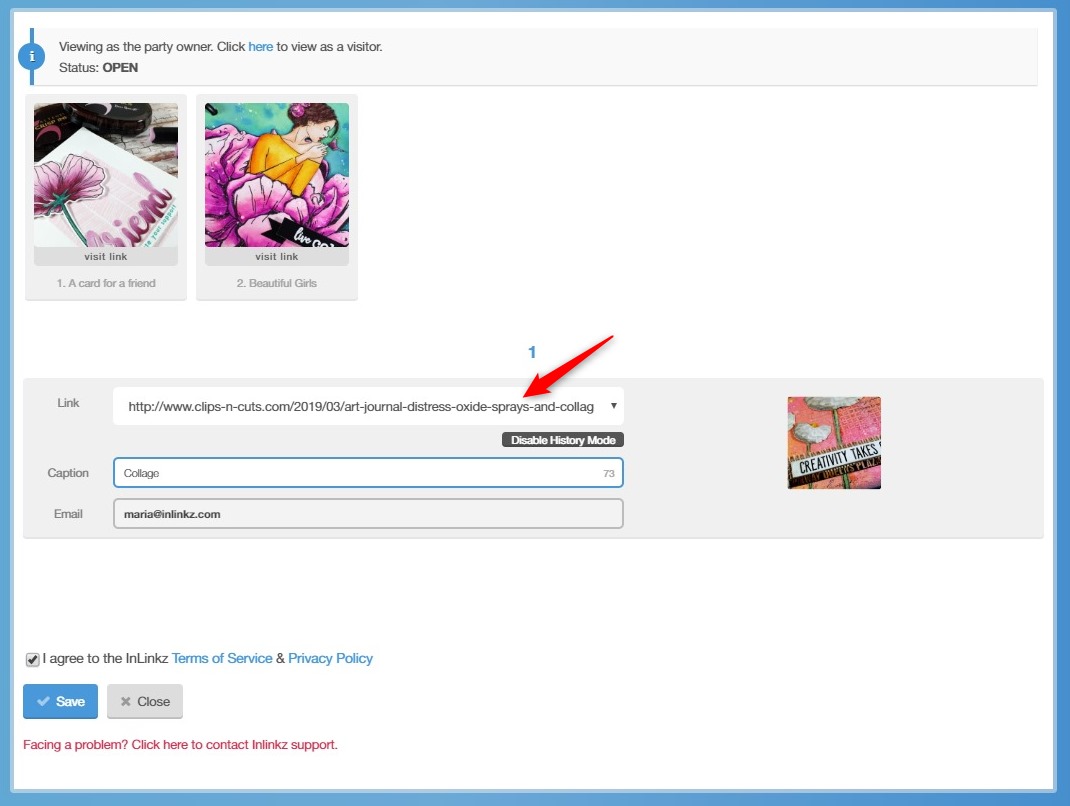
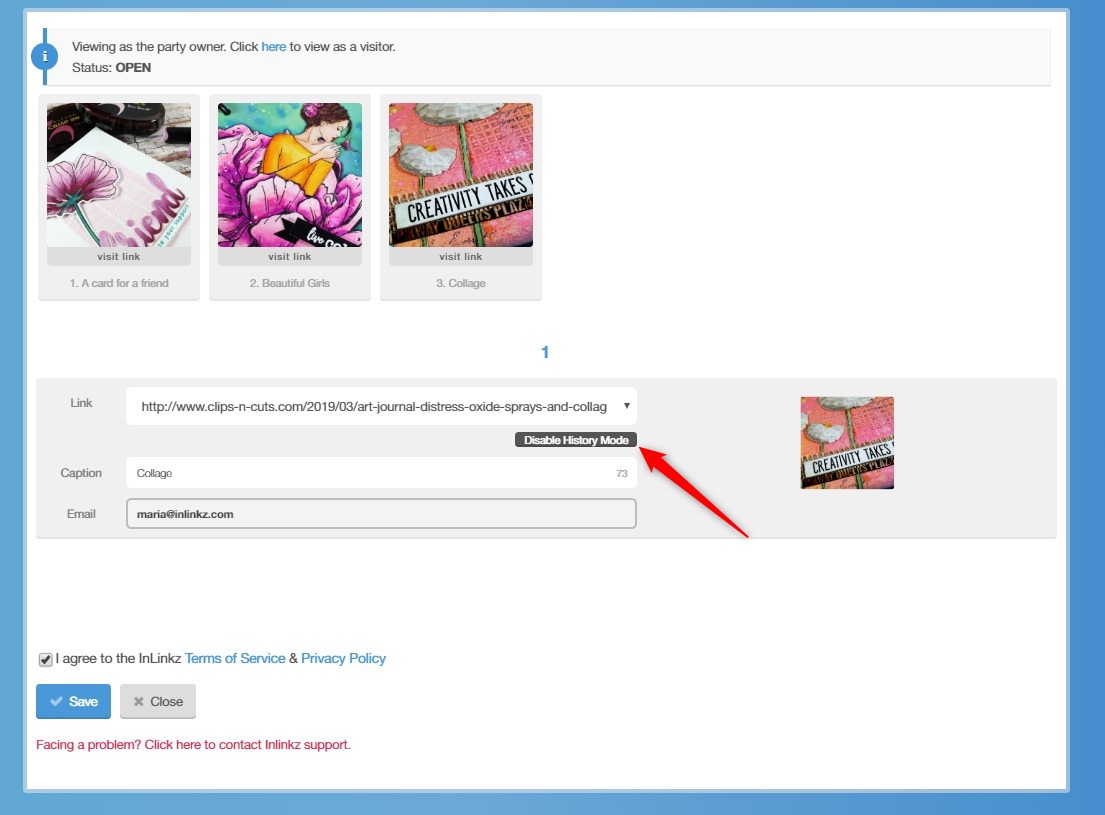
As we mentioned in size, it is a good opportunity to give you a small tip about that. According to some interesting information I found from Dr Lars Muckli, from the University’s Institute of Neuroscience and Psychology, “When direct input from the eye is obstructed, the brain still predicts what is likely to be present behind the object by using some of the other inputs to come up with best guesses.” This why you should be very careful when you select the part of your image that will be used as a thumbnail. Our brain plays games and trying to guess what is the part of the picture that’s missing might lead to misunderstandings and “click loss“.

Take a look at the following example to see what I mean:

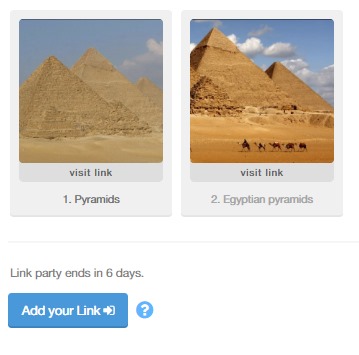
Look at the following thumbnail. What would you think?

thumbnail

Ok, just some pyramids. And the rest is sand….sand…and sand again. And maybe some more pyramids.”

However, if you take a look at the whole picture, you will see that there is more than pyramids.

choosing the right thumbnail

There is also a couple on a camel. Now if you have chosen “Figure 10” as a thumbnail:

choosing the right thumbnail

You could imagine that on the left side of the photograph there is also one, or more pyramids. The photograph becomes a lot more interesting than if it included only pyramids.

So be careful which part of the image you will choose as a thumbnail!

References:

How To Integrate Your InLinkz Account With Mailchimp

If you run a blog for a while, you already know how important it is for your blog’s growth to have established a mailing list.

InLinkz helps you build a responsive mailing list that people will be engaged with the emails you sent them.

InLinkz integrates with MailChimp for connecting your party guests with your mailing list needs.
MailChimp is a popular email marketing service that offers advanced mailing list management. If you do not have a MailChimp account yet, click here to sign up.
Inlinkz offers to all Pro users a simple way to upload their Guests list (aka a list with the emails of the people that participate to their parties) to MailChimp and use these contacts to create marketing campaigns for their entrants.
To import your InLinkz Guestlist in your MailChimp list and create marketing campaigns for your entrants, you have to enable the integration with MailChimp.

Integration with MailChimp

1. Log in to the Inlinkz Dashboard and go to your Settings.

Set up Mailchimp on InLinkz

2. Select “Integrations” from the menu on the left sidebar.

Mailchimp integration

3. Open your MailChimp account and go to your Dashboard.

Mailchimp dashboard

4. Click your name and select Profile.

Edit your Mailchimp Profile

5. Click Extras and select API Keys.

API Keys

6. Click the Create A Key button.

Create an API key

7.  Copy the API key.

Copy your API keys

8. Go back to Inlinkz Integrations. Paste the API key on the respective box and click on search.

Add a new list to Mailchimp

9. Select the MailChimp list you want your guests’ emails to be added and save.

Mailchimp integration

That’s it. Your InLinkz Guestlist has been integrated with your MailChimp mailing list.

The only step left is to upload your Guestlist to Mailchimp every time new emails are added.

To do that, simply go to the InLinkz Guest page and click on the Upload to MailChimp button.

Export email to MailChimp

Select a list from the dropdown menu, if you have created more than one and click to submit your selection.

Select mailing list

Go back to MailChimp and send your new campaign to your entrants.

Prepare for launch

Visualize Your Link Parties With The InLinkz Timeline

The InLinkz Link Party Timeline is a visual that shows all the link parties you host labeled in chronological order and on linear time scale.

It is an indispensable tool for those cases where you have a lot of link parties in a row and you need to schedule one more but, once you add the dates and press the “create” button, the following message pops up:

Limit for InLinkz link parties running at the same time reached

Why does this message pop up?

Inlinkz plans come with a set amount of link parties you can run in parallel. Parallel open link parties are those parties can be open at the same time period, including future ones. If this limit is exceeded, then the above “Whoops” message is shown.

How to check for the available dates

Let’s see how the timeline can help you quickly and easily carry out planning for the new link parties.

1. Go to your Inlinkz Dashboard and create a new link party.

Create a new link party

2. Set the desired dates. If the “Whoops” message is shown, the system will request you to check the available date periods by clicking on the red link underneath the opening date.

Set the desired dates

Alternatively, just check the Link Party Timeline from the board on the left.

3. Once inside the timeline, you can see a visualization of your link parties’ running periods.

A visualization of the link parties

The ended link parties are marked in red and the open or scheduled ones are marked in blue.

4. Use your mouse wheel (or pinch your device screen) to zoom in/ out for more details.

5. Having in mind your plan’s limitation for the link parties you can run in parallel, use the field underneath the timeline to check the available dates for your next link party. Set an opening and a closing date and click to check the best date for your new party.

Check the available dates

6. The period in question is bordered with red bars. If the new party you want to create exceeds your parallel open parties limit, simply go back to your dashboard and select new dates.

Available dates to run a new link party

Have you played around with the Timeline yet? Let us know what you think!

Creating A Responsive Mailing List With InLinkz

Your mailing list is the most direct way for you to communicate with your readers.

Even if you have an engaged audience, they might not check your blog regularly but they do check their emails on a daily basis. Υou need an email list so that you can connect with them.

An email list can have a great impact on your blog’s traffic (and revenue). No matter how important social media can be for your marketing strategy, the most effective and responsive channel to communicate with your audience is through their inbox. An email list can be vital to the success of your blog.

Once you have an email list established, you can utilize it to grow your blog. Email lists have proven to be versatile for building a trusting relationship with your readers; you keep them up to date, promote new posts, send notifications, promotions etc.

Link parties are great for increasing the number of your email list subscribers. Even if you have just started a blog or you have an established blog, link parties can help you build a responsive mailing list.

People that have landed on your blog and join your link parties share similar interests with you. They have already given their consent to be contacted when  they participate to your link party so it is more likely than they will be engaged with the email you sent them. This means more people opening your emails, clicking on links and taking the actions that you want them to take.

InLinkz Guest Page

The InLinkz Guest page provides a full record of entrants’ activity in your link parties. From the Guest page you can:

♦ Get entrants emails

An alphabetical list with all entrants’ emails is available in Guest page.

Entrants' emails

Use the pagination numbers at the bottom of the page to browse through the list.

Utilize the search filter to find one specific entrant’s email, for example, to locate the winner of a challenge.

find one specific entrant's email

Select an email address to be directed to the Entrants’ History page.

Entrants' History

View all the entries that have been submitted by this entrant to your parties.

View all the entries

♦ Get entries

Sort the entrants by the number of entries they have submitted to your parties and check who is the most active participant.

Get entries

♦ Get the latest entry

Sort the entries by the latest submission and view who was the last participant.

Get latest entry

♦ Export emails

InLinkz allows you to export entrants’ details to an excel file for future use. Keep in one file participants’ names, the date they joined your party and the total links they have submitted to your parties.

Export entrants emails

♦ Upload it to MailChimp

Upload the emails of your entrants directly to MailChimp and use these contacts to your mailing campaigns. Trigger your entrants with professional looking content and bring them back to your blog.

Mailchimp

Pin Links To The Top Of An InLinkz Link Party

Sometimes you need to feature or promote some links that have been submitted to your InLinkz Link Parties.

For this purpose, InLinkz has a special feature called Pin Links to the Top that will help you achieve exactly what you want.

Pinning allows you to keep links at top of your link party. This is a helpful way to highlight some important links/ posts that have been submitted to your parties so as your audience pays attention.

How to pin a link to the top

In order to mark links as pinned, all you have to do is follow these quick steps:

1. Go to your InLinkz dashboard and find the link party you want to pin the links.

2. Click to view the Entries.

View party's entries

3. Search for the link you want to pin. If you have a lot of submissions, filter the entries by using a keyword or entrant’s email:

Search for a link

4. Click on the green button on the right to pin the link.

Pin a link to the top

5. Click on the blue button to proceed.

Pin a link to the top of the link party

6. Click to view the party.

View a link party

7. Refresh the page and the pinned link will be shown at the top of the party.

Link party links

Additional information on Pinned Links

♦ If you pin more than one link to the top, the links will be sorted at the top from the oldest submitted link to the most recent.

♦ It might be required to wait a few seconds before the pinned links will be moved at the top. Refresh your page a few times.

♦ To remove a link from the top, go to the entries page and click on the orange button next to the link to unpin it. The link will be returned to the initial position.

Unpin a link

Drop the index numbers when you pin links

When a new link is submitted to an InLinkz Link Party is assigned with a number. This number cannot be changed even when you have this link pinned to the top of the link party.

To avoid having mixed index numbers in the party, enable the “Don’t show the index number for each entry” box for this party.

Don't show the index number for entries

Once you check it, your link party will be shown like this:

Link party links

InLinkz Link Parties | Filtering Your Links

Let’s say that you have submitted a bunch of links in numerous InLinkz link parties and you want to have an overview of your entries.

Logging into InLinkz, you are able to get a detailed overview of

*the links you have submitted

*the parties you have joined and

* the clicks you have received for each of your entries.

Joining link parties might be a fun experience but, if you are a blogger you might also want to see the benefits from linking up. You have spent some time posting, linking up, visiting other blogs and leaving comments, so being able to filter your links and exporting some information helps you schedule your linking strategy better.

Login to InLinkz

Login to https://fresh.inlinkz.com/login using the same credentials you use to link up.

If you are an entrant to InLinkz Link Parties, once you sign in, you will be directed to a page that will look like this:

Entries page

If you are a host, click on the arrow next to your name to open your Entries history:

Entries history

Basic information

Link details

All the links you have submitted, even the deleted links, are shown on your dashboard. If you are joining a lot of parties, this will help you keep track of the parties you want to participate so as not to skip any.

(1) Click on one link to be directed to the original post.

(2) Click on one Link Party to open it in an InLinkz external page. If the party is still open you can submit a new link from this page as well.

(3) Sort the links by the clicks they have received to see which was your most popular link.

(4) Sort them by the submitted date to put the most recent first or vice versa.

(5) Click on the bin to permanently delete a link from a link party.

Links details

Click on the details to expand and see:

Link details

(1) which image you have used for this link

(2) the caption you have entered

(3) the exact URL of the post you have linked up through (Referrer URL). This is useful in case of blog hops, where the same link part appears on multiple blogs.

Filter by Date

Filters allow you to display entries that meet specific criteria. For example, you may want to see which links were submitted at a specific period, let’s say during May.

Set the filter to reflect the above period and  display only the entries during May.

Filter links by Date

If you want, you can include multiple values; sort for example the links by clicks and see which links got the most clicks during May.

Filter links by clicks

Filter by Link

Combine both filters to extract information for only one link.

Select a link from the drop-down menu and see the performance only of this link for the defined period.

Check the example below.

It is clear that the same link performed differently based on the clicks it got on two parties.

Combine filters

Click on the x to reset the filters.

Tip: Track your links for a while to extract safer results for the effectiveness of a Link party.

Link parties | How To Keep Your Followers In The Loop

As a blogger, you know that your followers are one of the most valuable assets of your blog. Even if the social media platforms or search engines change their algorithm, your followers are yours to keep.

Running link parties is a great way to keep your followers active and interact with them. In fact, those who love your parties would like to be ensured that they won’t lose any of your upcoming parties.
Explore below to learn how you can keep your followers in your loop.

How an entrant can start following you

InLinkz allows entrants who participate in your link parties to become your followers by simply putting a check on the “Follow host” box while on the linking page.

Once an entrant becomes your follower, you will be able to send them a notification directly from your InLinkz dashboard to their inbox each time you run a new link party.

How to notify your followers

Here is how you can notify your followers (aka the entrants to your party) with three only steps:

1. Simply click on the “email followers” link on your new linkups board, as shown below:

2. Select the blog where you will host the link party.

3. Send the notification to the people that follow you.

The notifications that the followers will receive will look like this:

You can send them an email notification either when you create the new party so as to have enough time to schedule their entries or when the party opens so as to be RIGHT there when the party is ready for entries.

A new link party just opened. Join now

Encourage those who participate in your parties to start following you and not miss any of your link parties.

Let People Join Your Challenge Only With An Image (No Blog Needed)

Challenges are a popular way to attract more followers, engage your audience and increase blog’s visibility. They’re also a great practice for online shop owners and marketers, as it can boost sales and grow their business.

Blog challenges offer a lot of value to your readers and keep your blog fresh by producing authentic content created by them (User-Generated Content).

A challenge, while it might require some preparation from you to nail down an enticing theme, set up rules and select the appropriate prizes, only takes a few easy steps to launch it with InLinkz.

Let’s explore how an InLinkz challenge works and how to host a challenge where everybody can join, even if they don’t have a blog.

What’s the new option in InLinkz challenges

Heretofore, in order to join an InLinkz blog challenge, it is required from entrants to submit a link, which usually is the URL of their blog post or their social account. Now,  hosts can allow their entrants to join a challenge (or a giveaway), even if they don’t have a link to submit. 

How to set up a challenge open to all.

1. Go to your InLinkz dashboard and create a new party.

Create an InLinkz link party

2. Fill in the basic details of the challenge. Set your terms and conditions.

Enter challenge details

3. Enable the This is a Giveaway option if you want to pick a winner randomly at the end of the challenge.

InLinkz giveaway

4. Enable the “Allow entries without a link” option. Click to create the challenge.

4. Copy the code and add it to your blog while on the HTML mode.

5. Once the challenge opens, the +Add Links option will be shown. The challenge is now ready to accept entries.

How entrants can participate without entering a link

1. Participants can join the challenge by submitting a photo according to challenge rules. In case they desire to proceed without entering a link, they simply have to select the corresponding option on the link page, as shown below:

2. Once they click on it, the widget will automatically switch to the upload function.

3. The entrants can now save an image on their computer and drop it in the widget.

4. Once they bring the image in, the only thing left is to enter a caption that describes the image, adjust it to fit, if necessary and save.

5. Here is how it will look like when the image is added successfully.

6. Since no link will have been assigned to this image,  people that click on that image will be directed to an InLinkz-hosted page to view it on a bigger scale.

If your audience loves your challenge and they desire to get notified every time you host a new challenge, then they have the option to start following you:

Spread the word

InLinkz encourages entrants to spread the word about a challenge by providing easily sharing buttons for Pinterest, Facebook, and Twitter. This is a great way for the host (you) to reach a wider audience.

Don’t miss promoting your challenge and talk about it on your own social networks and invite people to join so as to increase your exposure.

How To Quickly Add Links To LinkUps Using History

Starting today, you can add links quickly to multiple linkups using the recently-introduced Entries History function.

The Entries History is an incredibly useful feature designed to increase participation in link parties. Without much fuss, entrants are able to add the same links to different link parties with just one click!

Entrants don’t need to remember each specific link they have entered. Neither re-type the captions nor set cropping parameters for images, since it’s all in the History.

To use the Entries History:

1. Click to switch to History mode.

2. Your last added link will be displayed by default.

3. Click on the dropdown menu, if you want to select another link. Inlinkz will show you a list with the last 10 links you’ve added.

4. Scroll through and choose one link. Save.

5. Disable the history mode by clicking on the relevant button